
Part of the reason that we fell in love with our house was because it included a large covered porch with high ceilings and a place to sit and talk. While the beauty of the porch was always there, we really had never fully utilized the space and it always just felt unfinished and unwelcoming. With harsh light and a fabulous view of the neighbor's house, was there a lot left to be desired about our outdoor space and I never knew what to do about it.

But, recently our porch got a much needed makeover thanks to World Market, and I couldn’t be happier with the results. We go to World Market pretty frequently now that we’re addicted to HGTV and Pinterest and it seems we always have a room we’re redoing that could use the charm of World Market. While this time around I didn’t have any specific ideas of what I was looking for before going into the store, once I was there and I saw all their new offerings for the season, I got some serious inspiration for our outdoor space and started designing on one of their couches.

We ended up designing some DIY outdoor curtains for our space using some of their tablecloths {full instructions below} as well as adding all the details to make it come together as an outdoor oasis. Since all the World Market outdoor furniture and accents were on sale, it made it easy to really go all-out and do it up the way we always hoped, without having to sacrifice style for savings.
My first must-have was some much-needed color for the space, which was easy to bring in thanks to all their amazingly colorful themes for summer. Whether you choose to go with their Carnaval, Rio, Nautical, Bali or Indonesian collections, you will get tons of color choices to help add some pop to any outdoor space.

We ended up mixing and matching from the collections and getting their last Red Lotus Blossom lumbar pillow, two sets of Carnaval Stripe Battery Operated Lanterns {8 total}, a Cadiz mosaic bistro table, a outdoor laptop table {for working outside!}, two white tablecloths to use as curtains {they didn’t have curtains long enough for our massive porch height and we got crafty}… and a toy accordion and some candy. Because, the kids needed an accordion and candy. Obviously.
While our cart did look a little eclectic at checkout, I was confident that the furniture we already owned and a few repurposed accessories from our home would tie it all together nicely and the end result wouldn’t seem thrown together or hodge-podge-y in the slightest. When I got my total bill, I was honestly shocked at how inexpensive everything in my overflowing cart was. Every item we got {except the candy} was on sale and most of it was 30% off or more, so it made it easy to splurge a little and get a lot of good, versatile pieces for our design.

Once we had finished our World Market shopping, we took some measurements of the porch and hubby headed off to the hardware store to make my dreams of a secluded porch a reality. While he was gone, I did some laundry, some rearranging, some replanting, some cleaning, and some putting together, and when he was home we were ready to transform the space.
Here’s what we needed for our custom DIY outdoor curtains and copper rod:
• Two World Market 120”x60” white tablecloths. They have many different curtain sizes available to choose from, but these tablecloths were ideal for our space with such a high roof and relatively inexpensive at $29.99 apiece. Considering I had gotten a quote for outdoor curtains previously and it ended up being more than $600, this was more than a bargain and something I can always change for the seasons.
• Two sets of drapery clips to hang the tablecloths. Yes, we could have added rivets to the curtain tops and done something fancy with our drapes, but I hate sewing, so this was my solution. I highly recommend it as I could always change my mind down the road and redo the curtains in another configuration.
• Two 10’ copper ¾” pipes, quick-connect copper end caps and copper coupler to attach the two pipes. Again, we could have bought a really long curtain rod, but with our porch length, we needed something custom and this was a great, inexpensive option that ended up being quite pretty once installed.
• Three screw-mount hooks to hold the copper rod in place. Unfortunately, they didn’t have the option of copper hooks, so we will eventually paint ours white to blend a bit better with the overall design.
• Ribbons for tie-backs.<
br />
I started off by washing, drying and ironing the tablecloths so I could get an idea of how much they would shrink and we could install them properly. I also did a little research to see if there was a way to waterproof them to resist mold and mildew, should we end up needing to do that down the road. I came up with a few solutions we might try out, but I’m still uncertain if we will actually need to do something like this since our porch has a large overhang and we don’t really get rain up there, especially during the summer. Since the “curtains” are completely washable, we might just launder them every few weeks to keep them bright white and then take them down once the summer ends and we find we no longer use the space on a daily basis.
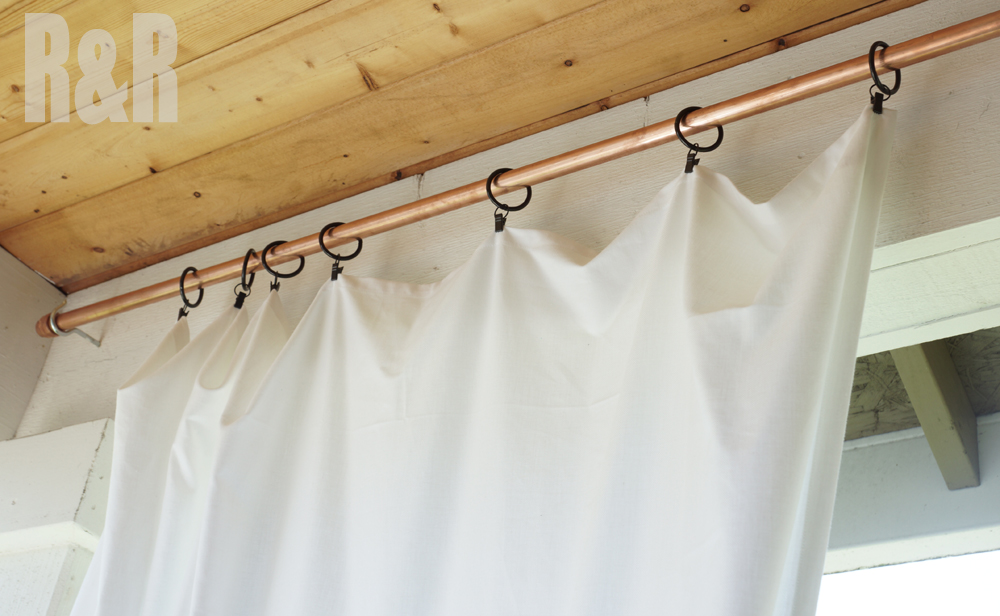
After the fabric was ready we started on the actual rod construction, which ended up being incredibly simple. Since our space was over 12’ long and we needed to get two pieces of pipe to cover the whole length, hubby got a quick-connect coupler to attach the two pieces in the center and then copper end caps to finish off both ends and make sure the rod doesn’t slip. Then, we measured for the three screw-mount hooks, drilled them into our porch beam, and slid the copper pipe in, creating a copper curtain rod that perfectly fit the space.

Once the copper curtain rod was up, we simply attached the drapery clips to the top of the tablecloths, slid them on the rod, and voila, outdoor curtains! While I worked on getting the spacing just right, tying them back just so and rearranging the furniture on the deck, hubby made some wire hooks for the battery operated lanterns and hung them on the rod at various heights to fill the gaps left by the tied-back curtains and we sat back to admire how nicely it all came together.

The DIY curtains and World Market porch re-do ended up being the perfect length project for naptime and by the time the kiddos were awake, we had completely assembled our new outdoor living area and were ready to unveil the results. Immediately upon seeing it through the window, my daughter started jumping up and down and said “someone fancied up our porch!” followed by “I want to have a picnic out there!” I would say that's a success.

Since the day project was completed, we have found ourselves spending a whole lot more time outdoors. It has been a great way to get the kids some fresh air mid-day without having to worry about scorching sun or rain ruining our fun, a perfect place to do arts and crafts, have a picnic lunch, play with noisy toys, get a little work done while enjoying being outdoors, or take some relaxed and fun pictures with natural light.

If I had known the amazing oasis I could create with a little over $200, I would have done it long before this summer. Since most of that money was spent getting a good quality DIY curtain rod, it makes the design so much more flexible and easy to change throughout the year with a quick trip to World Market. While we went bright and bold for summer, it would be easy to tone it down or play it up with new accessories without having to redo the whole design, which means I can constantly update it to my heart’s content.

There really is nothing better than making good use of every inch of space in your home so I was thrilled that this project gave us an extra 120 square feet of living space without sacrificing a thing. Even with two DIY projects rolled into one, it really was easy to do, inexpensive, and it ended up giving me an outdoor photo studio with nice, diffused light, an outdoor work station so I could take my laptop outside, and a great protected place for the kids to play all summer long – no matter what kind of weather we’re having.
As if shopping at World Market didn't already have enough perks, they are also running two awesome promotions this summer to reward all their loyal customers. The Summer Getaway Sweepstakes is awarding a trip for 4 to anywhere Southwest flies including hotel accommodations and a $500 World Market gift card every week during the promotion. Enter today by clicking the logo below and you could be one of the lucky ones to take a vacation on them. 
Also, from with their Buy & Fly promotion, all in-store World Market receipts over $20 from June 16 – July 13 will have a special code that can get you 15% off roundtrip Wanna Get Away fares! Where will you go?

Connect with World Market via worldmarket.com, on Twitter, and on Facebook
 This shop and DIY has been compensated by Cost Plus World Market, but as always, all opinions are 100% ours.
All these great ideas and sets are giving me ideas and inspirations. They are perfect for the summer outdoor experience.
Useful information like this, I will put this one on my bookmark list! Thanks for this wonderful post and hoping to post more of this!
http://www.surveytool.com/marketing-research/
Love this, thanks for sharing!